
Da Bloody Skull Boyz: WIP 7
I wanted to do something big this time around, for the 1000 point/round three of escalation. I figured it would be another battlewagon but what ended up happening was something completely unexpected.
This is the story of my “Counts-As” Squiggoth.
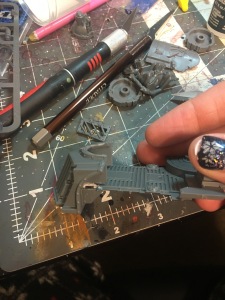
I first started with a plague furnace, building the frame just like the kit calls for. I trimmed the spikes off the front and back, as well as cleaned up the rope, stone and other non wooden parts to create this frame. I wanted something even more feral looking than the rest of my army. I envisioned a cart, maybe scraps from a previous wagon that had an explosion and was repurposed. Perhaps something even pulled by an animal…


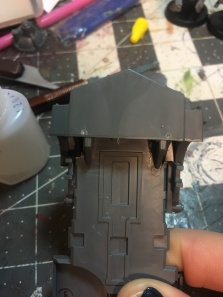
I had to trim the bottom of the posts to allow the battlewagon platform to slide through. Once added, I build the back like a regular ol wagon, plus some paneling to fill small gaps. I trimmed the side panels to fit the back, allowing the treads to fit on, and the front wheels were attached in place of the wooden plague furnace wheels.
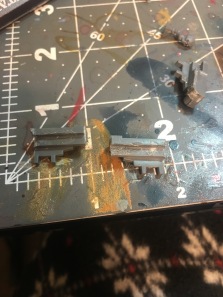
 I cut the front off, and added some more side plating from a separate wagon kit. The large wooden triangle frames came from the warpfire cannon kit and simply lined up and were glued in place. At this point I was firmly invested in a pull cart wagon. All it needed now was something to pull it.
And that something was this…

The Colossal Squig! This thing is really big… a lot bigger than I anticipated actually. I was starting to rethink this project, from just a battlewagon. Assembling left quite a lot of gaps, so some greenstuff work was needed to blend the skin on it.


I imagined something this size would be an ordeal to tame or wrangle up, so I added things to reflect that. I drilled some holes and, using plastic rods, drove spears into the sides of the Squig. These would end up being fairly crucial to the orks, as a way to strap the beast in. Now he just needed a steering mechanism. I chose to use the good ol carrot method for his motivation, adding two grots; one on top holding a pole made out of plastic rod, and another acting as the poor carrot, bound up in jewelers chain. I made a bit from the outside part of the Deff Rolla and some plastic rod, then securing it (and the grot on top) onto the beast with more jewelers chain. This saw the assembly phase complete.


Moving forward, I started painting the squig first. The body saw my usual progression of red; Mephiston, Agrax, Evil Sunz, and later Wild Rider red. The face Was done in a tanned flesh skintone progression; Bugmans Glow, Reikland Fleshshade, Cadian Fleshtone, Kizlev flesh and a light highlight of screaming skull. Teeth were my usual bone coloring, as well were the claws; Zandri Dust, Agrax, and then Ushabti Bone


Gums, tongue, and sacks along the head were done in the same pink progression; Screamer Pink, Carroburg Crimson, Pink Horror, then a light highlight of fulgrim pink in areas. The bone plate is where things got interesting, as far as a recipe goes. I started by washing a base of Dryad Bark with Druchi Violet. Highlighting from there went as follows; 50/50 Dryad Bark+Xereus Purple, 50/50 Dryad Bark + Genestealer Purple, 50/50 Gorthor Brown + Genestealer Purple, Baneblade Brown and finally some Screaming Skull.


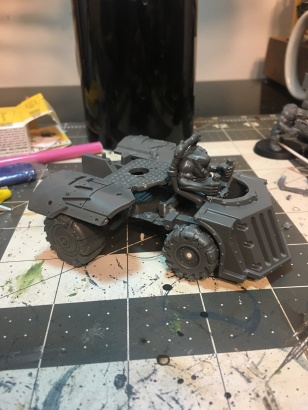
The rest was fairly straight forward for the metals and grots, who saw paint schemes just like the rest of the army thus far. This was a very lengthy paint project but very fun and challenging. With that done, I turned to the wagon. I won’t go into length on the process used, as it is the exact same as my other vehicles. The only difference is the addition of wood. I used Mournfang brown followed by Agrax Earthshade as a wash and Skrag brown, followed by Deathclaw brown as highlights.

You can see the finished wagon above. Now all that was left was attaching them and the base. I started by gluing them both, end on end, to an 8×11 piece of plasticard. Then, using a ruler (one of the plastic measuring sticks from Necromunda to be exact) as a guide, I left some card on the edges in between them, to create a slightly misshapen oval as the front base is smaller than the back. Using greenstuff, I then gapfilled to level everything out and sanded the edges to match the edge of the bases.
The End Result.

I added more chains, painting them like the others, to connect the two. Basing was simply a basecoat of Baneblade Brown, a covering of Agrellan Badland, a wash of Agrax Earthshade and then Tyrant skull drybrushed across the whole thing. Rynox Hide went around the edge to finish this massive piece off.
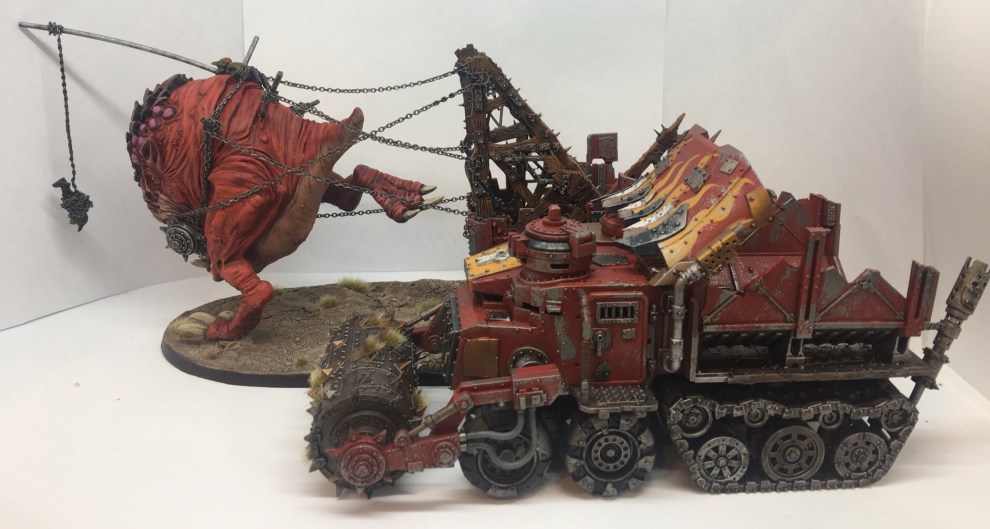 Here is a Battlewagon lined up side by side, just to show the Squiggoth’s footprint.
Words can’t express how happy I am with how this turned out. It has turned into an awesome game piece as well as a nice display piece, and has fueled my desire to create even more large orky items. As a side note, he performed amazingly on the battlefield. He chewed up and ate two Leman Russ and helped me win my first victory!
Thanks for reading! I am already planning on my next wave, for the 4th match of escalation; bringing me to 1250 points. The wagon above might be getting a nice loud upgrade and perhaps a new friend to join in the feasting of tanks! All of that will be coming soon.
Take care,
❤ Soph
Da Bloody Skull Boyz: WIP 6
With the build done for the next 250 points, it was time to start painting. The bikers were the first to see paint. They saw a similar method as the previous six, before them. Here we see all nine bikers, finished!


It really looks nice to have all nine together on a board. These will be the last I do, for this army, as I move my focus toward other pieces.

The Big Mek biker was a big challenge to paint, in that the mini actual ork is half encased inside the doomwheel body. Much of the same went into this, for color schemes, but I did have to add a few new tricks. The lightning effect was a process involving stegadon scale green as a base and then washing with coelia greenshade. The layering steps were only used on the crackle effect. Sotek green formed the beginning layer, followed by temple guard blue and finally some white scar in corners and peaks for an extreme highlight.
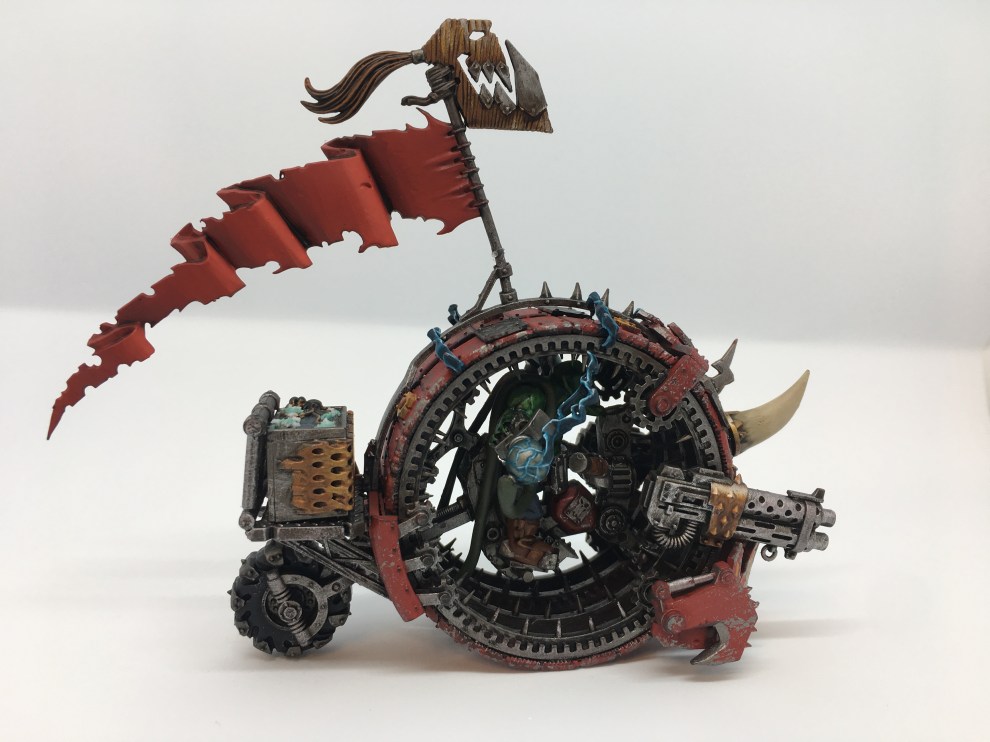
The skull banner was done with brass scorpion as a base and washed with agrax earthshade. I used bonecrusher brass as a first layer, hitting it only in sparce areas to give it a different gleam in areas. Stormhost silver was then used as the extreme highlight, following the same line of thought for the previous step.

The battery looked too clean, so I decided to add a battery acid effect to it. This was very simple to achieve. I took small blobs of Valhallan Blizzard and covered the connectors. I tried to make random sized blobs as I placed them. I then followed up with just a little Nihilakh Oxide closer to the connectors. It was the perfect tint to give a realistic corroded battery connector.
Although I still lost match two, they were fun projects. Check out my next WIP coming very soon, to see what I did for round three. It promises to be a long one.
Da Bloody Skull Boyz: WIP 5

With my initial 500 point list behind me, I turned my eyes onto what I could add to this army, to bring it to 750. I crunched numbers and, after a few days of debate, decided to go with the following:
warbiker squad w/nob
Battlewagon w/deffrolla
Big Mek on warbike
The battlewagon would take the place of my trukk, for now, until points allowed for both. I had already briefly brainstormed what I would do for everything, while working on the initial 500 points, but now it was time to start cutting plastic.
Today, we look at the Big Mek on warbike.
This took me a lot longer to think up than my previous conversions; about a week’s time. I knew the general gist of what I was trying to accomplish, but finding the right means saw me almost putting this guy on hold. Originally, when working on my other models, I had the idea to create something similar to the beautifully cinematic scene of the Bullet Farmer in Fury Road.
I loved this part, and thought it would be cool to have an ork weirdboy, standing on the pedals of a bike with his arms out and head tilted back, energy coursing through him. If you know 40k ork rules, then you’ll know what I quickly found out; no weirdboy on warbike! No matter… because you CAN give a bike to a Big Mek!
A conventional warbike would be too small, at least as-is. Many of the additions I looked at just didn’t fit it right, especially grot tank treads, servohauler treads (I really wanted treads!). In the end, while surfing GW’s site as I often do when I am looking for inspiration, I remembered the Skaven Doomwheel. It would be perfect for a weird looking Mek Bike, with a little bit of work and a few cuts.


I started by cleaning and assembling the outer wheels. The skaven model has a lot of wood to it, so we would have to fix that. The Citadel mold line scraper made short work of the wood grain and made it nice and smooth, to go for a metal plate look.


I cleaned up the center piece and removed the support for the seat, as well as the wiring and warpstone (as seen on the right). Taking a warbike, I trimmed down enough to allow a snug fit into the center. I chose the warbike with petals already attached to the body, to allow something for our Big mek to stand on.


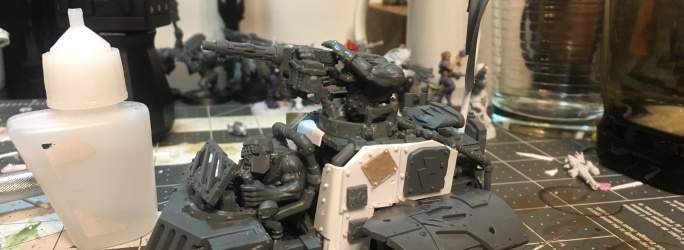
Next was the big guy himself. I used the legs cut from a Shokk Attack gun Big Mek and a torso cut from a savage orc; one of the two orcs in the kit holding the huge spear. While I could use the arms from the savage orc, I needed to do some small greenstuff work and reposition them, adding some muscle work. To cover the gap created by joining the two body pieces together, I made a belt from greenstuff and bits from the Shokk Attack Mek, as well as added some muscle work to smooth the transition. For the back, I mounted the big battery from the mek gun, using one of the platforms from the same kit. A warbiker wheel was swapped for the original, in the back. For the wheels, now that they were all smoothed out, I added rivets and diamond plate patches to both.


This was as far as I could go, with the kit segmented into three pieces. I glued the main three together, adding the gears to the bottom of the back. My whole idea for this character, was to have him crackling with energy. It started as a weirdboy, moving to a big mek with kustom force field. I pictured him holding two jumper cable ends together, an arch of electricity going over head. This was all before the doomwheel came into the picture, however. The wheel seemed far too big to achieve this… but what if, since it was to be made from metal, the electricity went into it and not over? I clipped off the mek’s arms at the elbows, using the prong ends from the shokk attack gun as the rest of his arms. Wrapping thin strips of greenstuff around the joint, I used tweezers and pulled at the putty until it looked like ripped flesh covering parts of the metal. I left portions of the electricity in tact, on the ends, lining them up as if to lash at the rim of the bike.


With our Mek in place, it was time to wire this bad boy up! I rolled greenstuff into two very long, thin strands and carefully looped it through the bottom of the bike, over each shoulder, and draped it slightly before connecting it to each orb end of his…..hands? Sure, we will go with hands…


Only thing left to fix was the front. I clipped off the front knobs to smooth it out and make way for my additions. At the top, I used the plate that came with the kit, connecting the two larger gears, but shaved off the skaven icon. Instead, I sanded down the back of the warbiker boss pole and fixed it atop. I created a cowcatcher using small bits of plastic rod, the large plate piece from the Ogre Kingdoms Ironblaster kit, and two claws from the Gorkanaut kit for the ends. I secured two dakkaguns from the warbike kit on each side, right above the cowcatcher, and placed a horn from the gorkanaut above it, covering where the top most knob was.
Lastly, I trimmed the top of the flag that came with the doomwheel and replaced the skaven icon with the sideways orruk banner from the orruk boar chariot kit.
Another conversion using bits from eight kits total; seems to be my magic number. I am extremely pleased with how he turned out and cannot wait to paint and field him in a couple weeks.
Next time, we will look at more bikers and a Battlewagon. Please drop me and comments or questions you may have. Thanks for reading!
❤
Soph
Da Bloody Skull Boys: WIP 3
Welcome back to another breakdown, part three of my Bloody Skull Boyz Ork army. So far we have covered most of the initial 500 point list created for an escalation league. There was only one piece left, and it certainly was the most involved and quite the journey.
The Warbuggy

Official Games Workshop image of the current Warbuggy.
I remember having this back when first buying the second edition starter set. It is a fossil that just looks out of place with kits made in this millennium- I’m not kidding, it came out July 1996 around the second edition codex; older than the wartrak (which is pretty bad these days) and the old bikers. I was determined not to look to the kit for anything, so the hunt began. Those who know me know that I shy away from most non GW bits or kits, so third party was out. It was looking like I was building this puppy from the ground up! Fortunately, I had a mountain of bits at my disposal, by this point, and some other tricks up my sleeve 😉
Remember the bike with the servohauler dome piece? Well, the idea for it spawned because I cut the dome portion off for this:


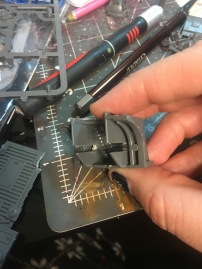
I had eyed the front grill from that kit for a while, feeling it would make for a great buggy. Having diced up a Taurox for my Trukk, I had a truck bed that I felt would work well, with the grill, to form the start. I had to modify each, seen above, to get them to connect. Cutting a notch in the back frome of the grill and then two on each edge of the truck bed, allowed them to fit together, seen below. I could already tell that this was going to be a collage from a number of different kits.
So far our kit count was two *(2).

I used frame bits from the ork trukk kit (3) to seat the wheels, cutting and trimming so they would rest flush on the sides of the truck bed.
While not shown, this was done for both the front and back wheels. The axel for each was created out of plastic rod, connecting each wheel and resting into the notch created by the ork trukk bits. The wheels for this came from the warbiker kit (4) and Mek gun kit (5); seen below.
 I may have gotten a little build happy, finding a groove, and pictures went to the wayside. Not to fret, I shall explain!
The driver was pulled from the ork trukk kit, with left over bit from the frukk frame used to steady the back. The back wheel wells were created from the Mek gun kit. The two door pieces from that kit were used to create the frame for the lager pieces that made up the cover, sitting on top of them. The center platform from the mek kit was placed into the center of the buggy, to form the turret base. At this point, the buggy was really starting to piece together. Just needed to mount the gunner, engine and clean it all up a bit.
 I added some piping, cut from the ork trukk turret, to stabilize the turret base. Using the rest of the trukk turret, I created a bit of a roll cage, seen to the right. It was pieced together using plastic rod, ork trukk, and mek gun bits; used to hold the turret in place and also wrapping around the engine. I snipped off the parts of the old taurox truck bed, at the tail end, to make it flush and sat the ork trukk engine in the space between the cage.
I built the rest of the turret as per standard ork trukk kit, using a warbiker dakkagun at first before swapping it out with the ork trukk gunner and big shoota. A 32mm base was used to stabilize and fill the gap between the turret bucket and the base. The driver received a head from the Megamobz kit (6) and a visor screen from the trukk kit. Finally, I trimmed off the gas tank from the ork trukk kit and fixed it onto the side. The meat of this buggy was finished!! That turret center just looked off, and unsightly, though. It was time to break out the plasticard!


Two types of plasticard were used here, plain white card from Evergreen and some diamond plate sheeting from Plastruct. I started by creating a frame sheet on each side, shaped to slide right in and neatly cover the entirety of the gap. Once in place, I cut different shapes and fixed them onto the sides. In addition to the plating, I took ork glyphs from the trukk kit and the flash gitz kit (7) and glued them on, as well. Once all plating was in place, I cut every small pieces of thin plastic rod into rivets and glued them around the edges of the plating, as seen before on my ork trukk. The final touch was adding the flag. This was made out of a flag from the Ironjawz Ardboys kit (8). I cut the beastman head out of it, fitted the skull front of a warbike in, and greenstuff gapfilled the connection points.
In the end; eight kits, one buggy! It was a lengthy build but a really fun one. With that build behind me, it was now time to put some paint to them. Part 4, to come soon, will tell a tale of a date with the warboss!
Please feel free to message if there is anything I may not have covered.
As always, thanks for reading!
❤ Soph
