

Da Bloody Skull Boyz: WIP 1
Orks has always been in my heart, ever since the pointy hat days of 2nd edition starter boxes. I have done all sorts of different incantations of them, my most recent having been some freebootaz that I began (and promise to finish!). My local Warhammer store is starting up an escalation league in January and I thought that it would be a great opportunity to crank some orks out. Instead of freebootaz however, I decided to go with speed freaks. There have been some conversions that I have been dying to play around with, and I figured this would be my chance.
I first outlined what would be in my starting 500 points list: Zhadsnark, 6 bikers, 1 buggy and a trukk with 10 boyz. I have wanted to mess around with making an ork trukk for some time, but the viability has been a bit lacking. Now they seem to be worth putting on a table, so my ideas are getting to see light. The ork trukk kit is great, mind you; It really gives a nice ramshackle look. I had something different in mind, however, and looked toward the Taurox model for the answers. I really liked the front of the taurox, and thought it would look fantastic as the front of a trukk.
I started by assembling the front to the bottom/bed of the taurox, as indented. While I did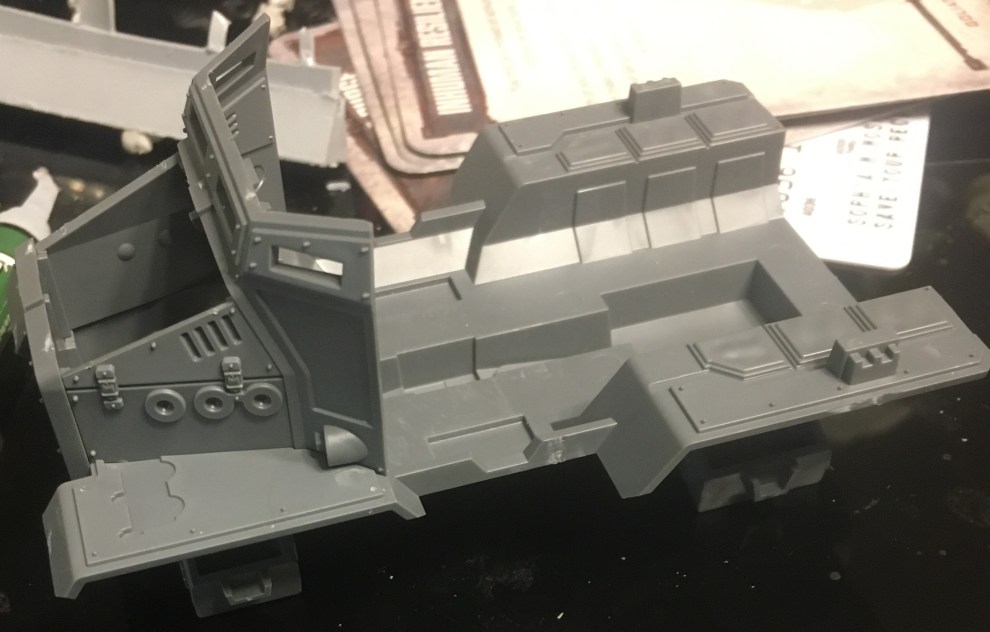 add the supports for the tracks, as seen in the picture above, I eventually chose to remove them. They did not work quite as well as I had hoped, for putting the wheels on.
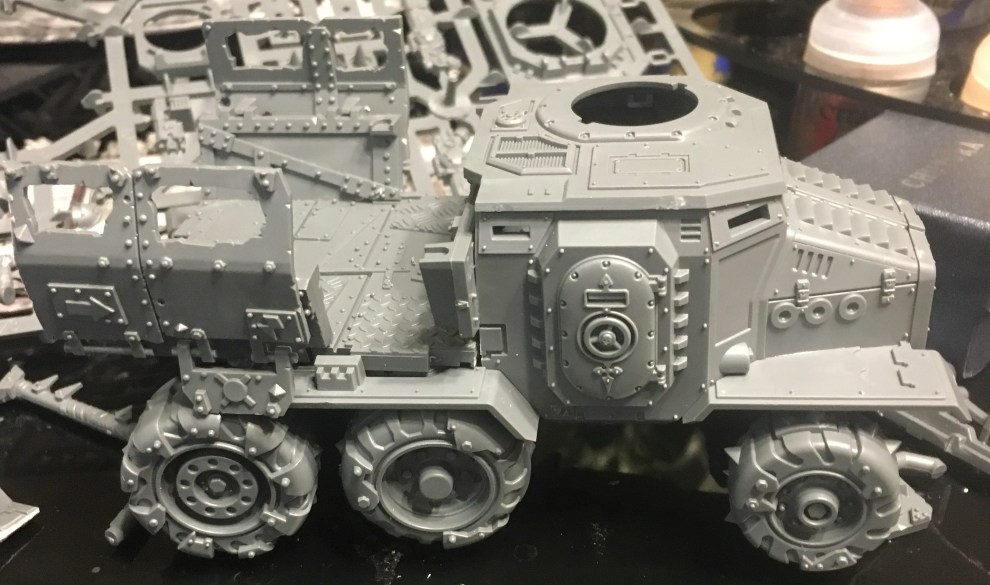 These two kits, at times, seemed like they were made for one another. I had to shave the bottom of the ork trukk bed, but ultimately it fit on surprisingly well. The trukk bed was built per the kit, with the front of the bed used to seal off the back of the cab, built to taurox kit standards, as well. The wheels were mounted on using the axels/frame of the ork kit. I shaved down the rounded center, to sit flush against the undercarriage. The whole build ended being a little longer than the original ork trukk, so I needed to use some plastic rod to connect the front wheel axel to the rear wheels.
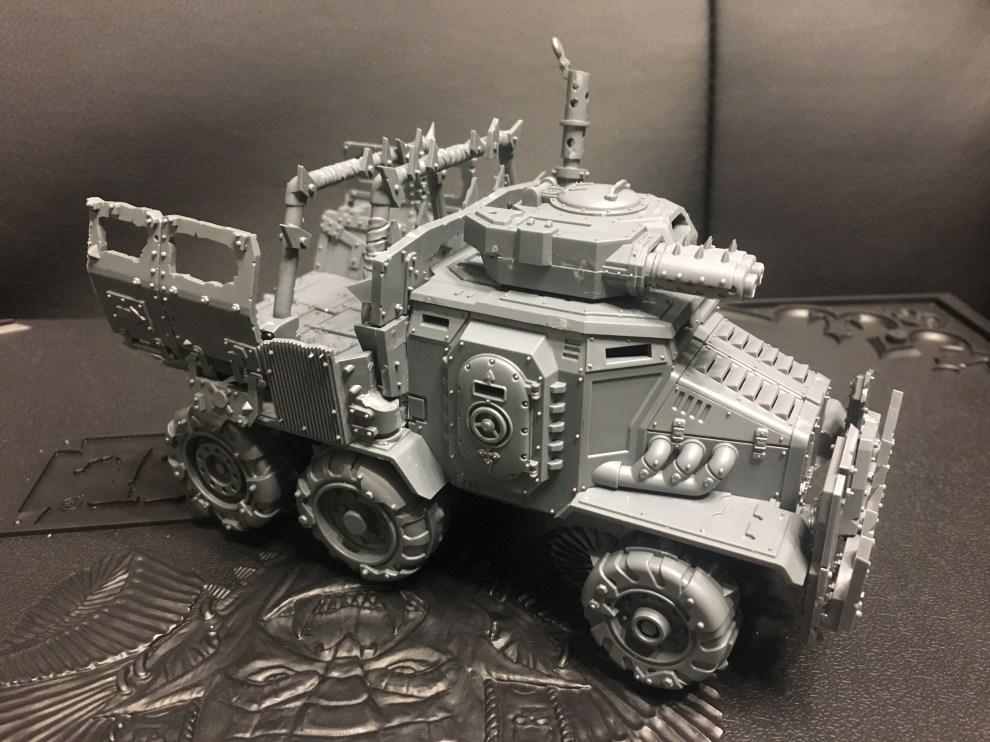 I added the standard piping to the taurox and gave it the ork trukk smoke stack on the side. I used two big shootas from the deff dread kit (I think that’s where they came from) and cut them to fit the turret hatch on the top of the taurox. For the back of the trukk, I added the roll cage bars, filled the gaps on the sides by cutting the corrugated trukk bit in half and shaving the ends down enough to fit against the sides. The hardest bit was the top half of what I used for the back of the cabin. The top of the taurox cabin has a lip in the back, so I had to cut the piece so that it could slide in with the lip inserting into it.
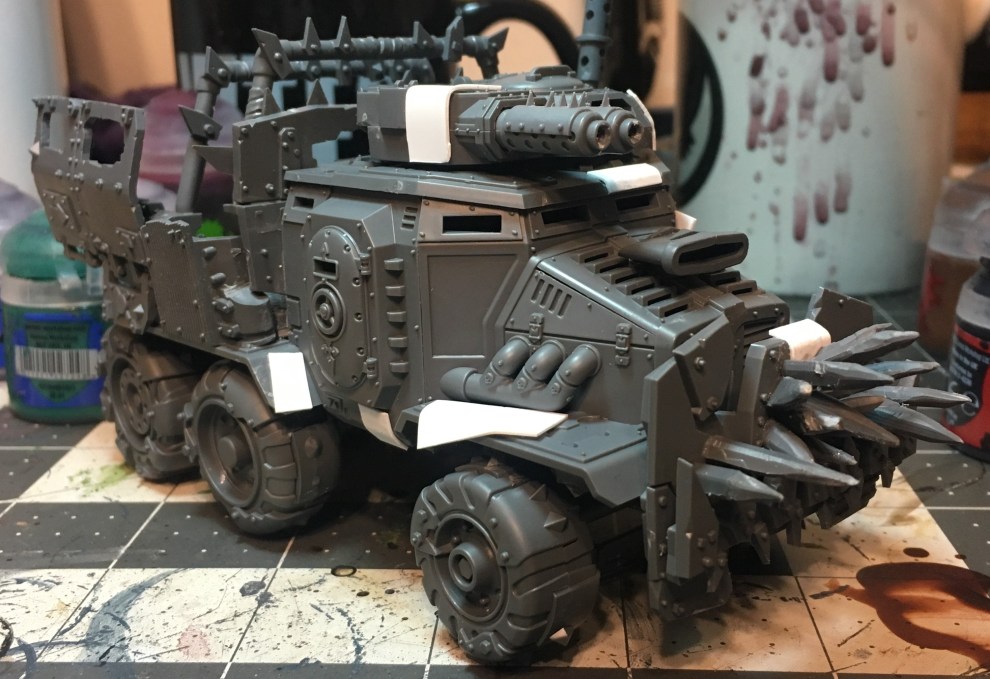 Let’s be honest; that taurox front was too clean looking 🙂 So I cut up some plasticard to act as metal sheeting, and glued it across the front, in patches. Cutting the vent off the top of the ork trukk kit engine, I fixed it into the hood by cutting a slot just big enough for the end to slide into. The spikes were made out of leftover sprue, cut and whittled into spikes as I watched Gremlins 2 to pass the time.
 The next step was extremely tedious, but I feel the outcome is well worth it. I used very thin plastic rod and sliced it to make very thin wafers. These served to be my rivets for the plasticard sheeting I added. I went through and glued them, in different densities, to each one. Through each panel, I also drilled a hole here and there, where a rivet should be. It is a nice way to break up the monotony of the task, and it looks like a rivet has fallen out, adding some character to the piece.
At this point, the trukk as primarily finished. I have plans to add spears and some skulls on it, but the core of the build has been completed. Next WIP, I will introduce you to the crazy lot that ride this beast into battle; the bloody skull trukk boyz, and I will talk bikers.
Thanks for reading 🙂 – Soph

Necromunda: House Escher WIP Part 3
Welcome back to the ongoing saga that is my Escher gang! If you have read part 1 and 2, you know all about my process in converting and preparing my gang to be painted. Having a few under my belt now, I have a solid process that I plan to take into the rest of the gang, and will share that with you now 🙂
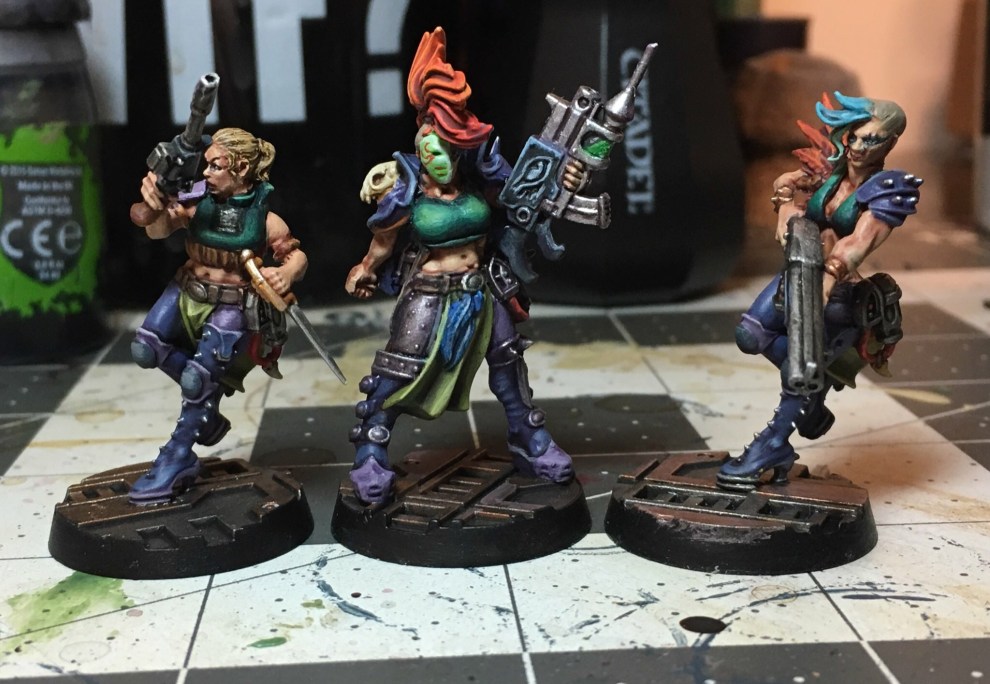
 I decided to start with my Tank Girl inspired ganger, aptly named Buck (Tank Girl’s name being Rebecca Buck). As a side note, it made me happy to be able to arm her with a shotgun, going for the double reference. Buck helped flesh out a lot of the gang color standard that you will see through the rest of the models. There are four standard transitions that I used here; skin, chest, boots/shoulder, and pant/knee colors. The boots and shoulders, except on a couple models, all receive the same color progression. I started with a base coat of The Fang, followed by a wash of Druchi Violet. Once dried I highlighted with The Fang once more, followed by Russ Grey for extreme highlight areas.

The lighter purple that you can see on the pants, shins and boots of Phantra, to the left, were a progression of Daemonette hide, druchi violet, a highlight of daemonette hide with warpfiend grey as the extreme. Their loin cloths, meant to be made from their prison world garb, were all done using deathworld forest as a base, athonian camoshade to shade, elysian green as highlight and ogryn camo on the extreme edges. Belts and straps were rynox hide, agrax earthshade, gorthor brown and then baneblade brown. Bone saw a traditional Zandri dust, seraphim sepia and then ushabti bone highlight. Eye makeup was simply Dark Reaper, while Phantra’s mask was a layer of
 waywatcher green, gauss blaster green highlight with evil sunz scarlet for the freehand. The tops/chest armor was a progression of glazing and shading to get the blending seen. Incubi darkness went on as a base, with carroburg crimson going on the under shade area of the chest to give a richer shade. Thin glazes of kabalite green and then sybarite green went on to form gradient highlighting, with coeliac greenshade used to tie in transitions. Skintone started with Bugman’s glow, followed by Riekland Fleshshade as a wash. Cadian Fleshtone started the base highlight, with kislev flesh forming the extreme highlight and, in areas like noses and knuckles, flayed one flesh used for a higher extreme. lips were simply bugmans glow with carroburg crimson washed over.

The faint shaved stubble on many of their heads, as seen on our sneering Juve, was achieved through glazing a 50/50 combination of mechanicus standard grey and kislev flesh, then changing it to a 2:1 ratio, heavier on the flesh tone. Flayed one flesh was used to give a scar here and there on the scalp. Eyes were nothing more than fleyed one flesh with rynox hide as the pupils, and eyebrows saw rynox as the color of choice, as well.
This covers most every color scheme on my Escher, thus far. Please feel free to comment or ask any specific questions, if I didn’t cover something that you want to know about. Thanks for reading 🙂

Necromunda: House Escher WIP Part 2
When I built my gang leader, I did it with aesthetic in mind. Her weapon loadout wasn’t created with any sort of point value calculated. With her done and my focus moving toward the rest of the gang, I needed to get that piece figured out so these were not only good looking but viable on the table.
 My champion was next in line for building. I gave her the combibolter that is normally seen on the gang leader, in stock builds, due to a lower cost. While the chem weapon option seems great, I opted to go cheaper and then outfit others with grenades to make up for the loss of template. The build was more straight forward, simply giving the coat and gun to her, while removing the whip. For some added difference, I covered over the chest to unify the plating and decided to give her a half mask. The idea popped that she uses it to cover the scar that she has. Also that if she has a scar like the leader, then it could be something ritualistic within the gang, perhaps a method of removing their penal world identification tattoos.
 I decided to skip to my Juves next. My list called for three of them, so I did them all in a bit of a batch build. These are supposed to be the fresh blood of the gang., so I imagined that they would be pulled from the population on Necromunda and not from the penal world; so no tattoos. Scarring would happen later, if they live long enough to seemembership. To make them seem newer, I used some heads from Victoria Miniatures again, as the hair isn’t as wild as the Escher. Like the champion, I used greenstuff to give more of a cloth look over the chest.
I hit a small wall when I started my gangers. The first two I decided to give some IG shoulderpads, keeping in theme with the looted armor that the leader had (the two on the right). otherwise the build was rather plain on them.
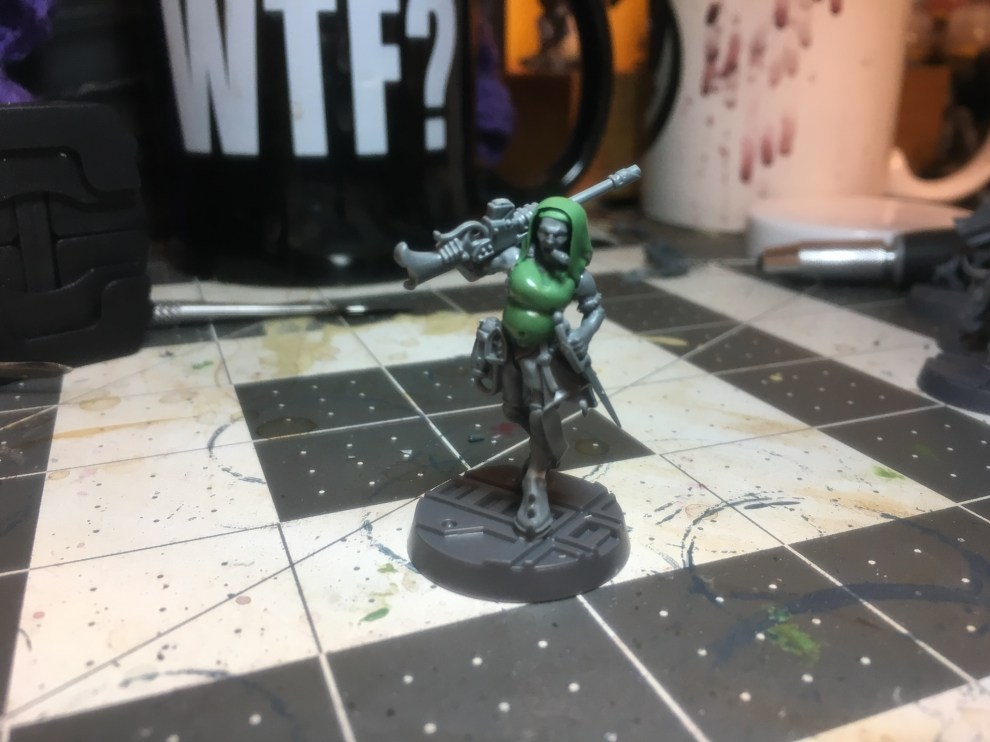
The farthest left used what I had learned while making the leader; using witch elf torsos. At this point I had covered over every models chest to make a “uniboob” torso. I decided to go the opposite, here. I have always been a fan of Tank Girl, so this was sort of inspired by her. I used greenstuff to fill out the bikini on her while trimming and smoothing out her head to give the shaven head look with just a couple bangs in the front left. The ganger next to her is when I started to add some humor to them. I found a space marine scope in my bits and thought it would be funny to put it on a shotgun. This eventually turned into making her a blind sniper, having double optic lenses to see, in addition to the scope. I stole a leg plate from the Goliath kit to add a little extra to her.
Then there was the final ganger…. if you follow my twitter feed, you probably saw her.
I made her on Monday’s stream. I had an idea to make a ganger with a gut, like Kiki Bulldozer from Raging Hero’s JailBirds. It was then suggested that she be made pregnant. I initially fought the idea but then, after finding it more humorous, decided to start sculpting it. I then remembered the cigars from the Goliath box and decided she needed to be smoking as well. The nun habit just seemed like natural progression, at that point, which was then added with greenstuff as well. It is a direct result of bad influences and feeding off from them. That being said, I love her and can’t wait to make her a focal point of the gang.
With her done, the gang build was complete.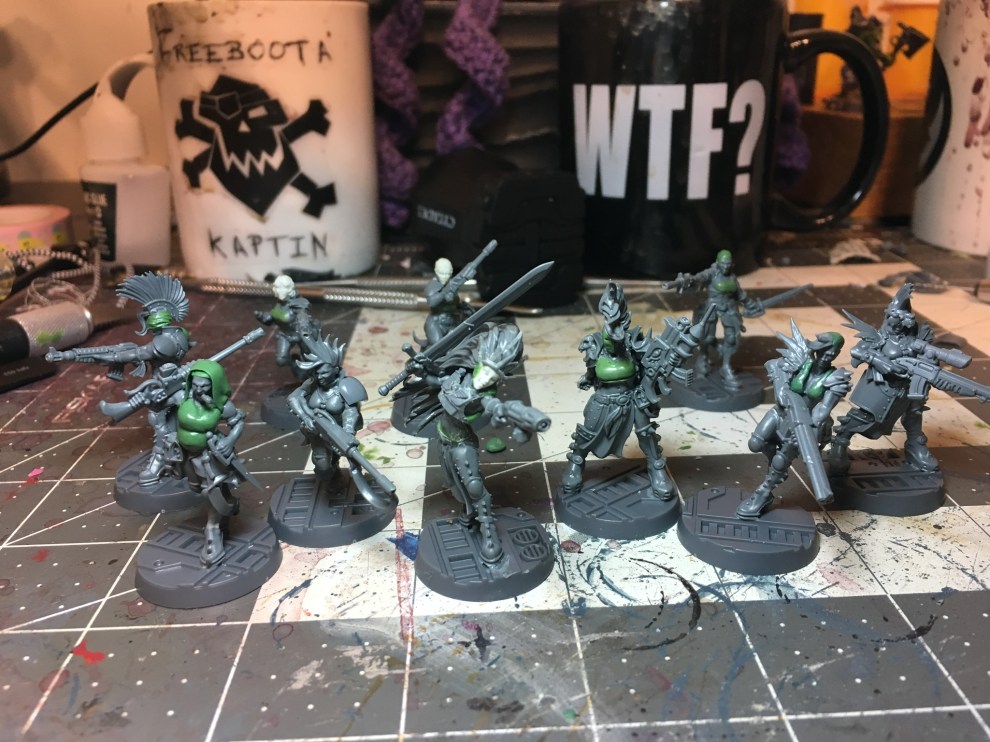 With assembly and sculpting finished, it was time to finish their story and put some paint on them. Who gets painted first? That is part 3’s job to tell us.
Until then, thanks for reading 🙂
Soph
