
Da Bloody Skull Boyz: WIP 7
I wanted to do something big this time around, for the 1000 point/round three of escalation. I figured it would be another battlewagon but what ended up happening was something completely unexpected.
This is the story of my “Counts-As” Squiggoth.
I first started with a plague furnace, building the frame just like the kit calls for. I trimmed the spikes off the front and back, as well as cleaned up the rope, stone and other non wooden parts to create this frame. I wanted something even more feral looking than the rest of my army. I envisioned a cart, maybe scraps from a previous wagon that had an explosion and was repurposed. Perhaps something even pulled by an animal…


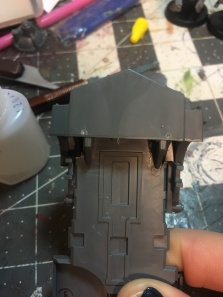
I had to trim the bottom of the posts to allow the battlewagon platform to slide through. Once added, I build the back like a regular ol wagon, plus some paneling to fill small gaps. I trimmed the side panels to fit the back, allowing the treads to fit on, and the front wheels were attached in place of the wooden plague furnace wheels.
 I cut the front off, and added some more side plating from a separate wagon kit. The large wooden triangle frames came from the warpfire cannon kit and simply lined up and were glued in place. At this point I was firmly invested in a pull cart wagon. All it needed now was something to pull it.
And that something was this…

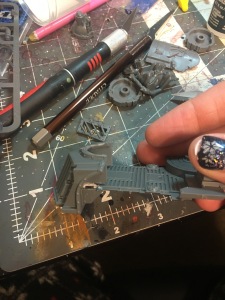
The Colossal Squig! This thing is really big… a lot bigger than I anticipated actually. I was starting to rethink this project, from just a battlewagon. Assembling left quite a lot of gaps, so some greenstuff work was needed to blend the skin on it.


I imagined something this size would be an ordeal to tame or wrangle up, so I added things to reflect that. I drilled some holes and, using plastic rods, drove spears into the sides of the Squig. These would end up being fairly crucial to the orks, as a way to strap the beast in. Now he just needed a steering mechanism. I chose to use the good ol carrot method for his motivation, adding two grots; one on top holding a pole made out of plastic rod, and another acting as the poor carrot, bound up in jewelers chain. I made a bit from the outside part of the Deff Rolla and some plastic rod, then securing it (and the grot on top) onto the beast with more jewelers chain. This saw the assembly phase complete.


Moving forward, I started painting the squig first. The body saw my usual progression of red; Mephiston, Agrax, Evil Sunz, and later Wild Rider red. The face Was done in a tanned flesh skintone progression; Bugmans Glow, Reikland Fleshshade, Cadian Fleshtone, Kizlev flesh and a light highlight of screaming skull. Teeth were my usual bone coloring, as well were the claws; Zandri Dust, Agrax, and then Ushabti Bone


Gums, tongue, and sacks along the head were done in the same pink progression; Screamer Pink, Carroburg Crimson, Pink Horror, then a light highlight of fulgrim pink in areas. The bone plate is where things got interesting, as far as a recipe goes. I started by washing a base of Dryad Bark with Druchi Violet. Highlighting from there went as follows; 50/50 Dryad Bark+Xereus Purple, 50/50 Dryad Bark + Genestealer Purple, 50/50 Gorthor Brown + Genestealer Purple, Baneblade Brown and finally some Screaming Skull.


The rest was fairly straight forward for the metals and grots, who saw paint schemes just like the rest of the army thus far. This was a very lengthy paint project but very fun and challenging. With that done, I turned to the wagon. I won’t go into length on the process used, as it is the exact same as my other vehicles. The only difference is the addition of wood. I used Mournfang brown followed by Agrax Earthshade as a wash and Skrag brown, followed by Deathclaw brown as highlights.

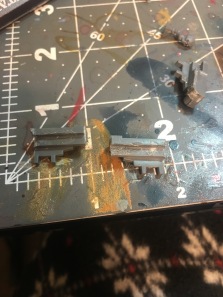
You can see the finished wagon above. Now all that was left was attaching them and the base. I started by gluing them both, end on end, to an 8×11 piece of plasticard. Then, using a ruler (one of the plastic measuring sticks from Necromunda to be exact) as a guide, I left some card on the edges in between them, to create a slightly misshapen oval as the front base is smaller than the back. Using greenstuff, I then gapfilled to level everything out and sanded the edges to match the edge of the bases.
The End Result.

I added more chains, painting them like the others, to connect the two. Basing was simply a basecoat of Baneblade Brown, a covering of Agrellan Badland, a wash of Agrax Earthshade and then Tyrant skull drybrushed across the whole thing. Rynox Hide went around the edge to finish this massive piece off.
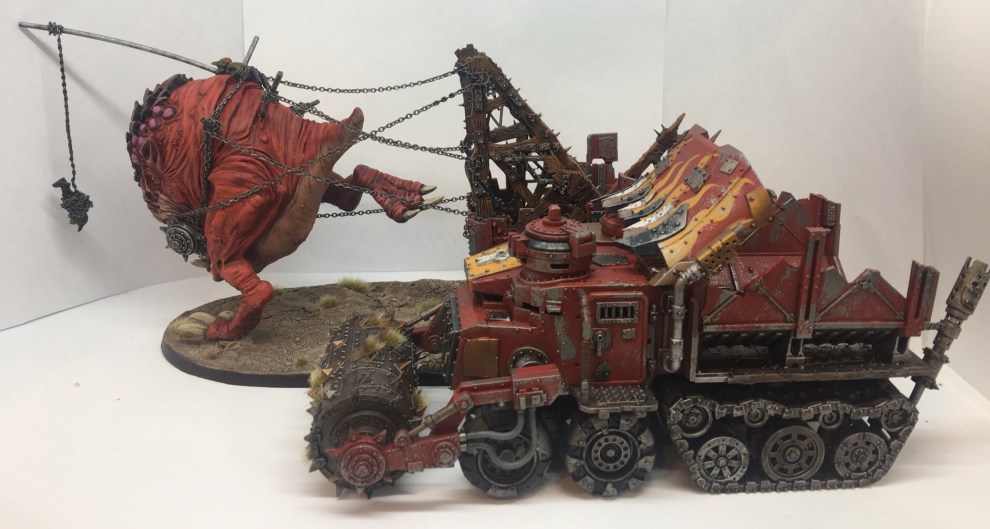 Here is a Battlewagon lined up side by side, just to show the Squiggoth’s footprint.
Words can’t express how happy I am with how this turned out. It has turned into an awesome game piece as well as a nice display piece, and has fueled my desire to create even more large orky items. As a side note, he performed amazingly on the battlefield. He chewed up and ate two Leman Russ and helped me win my first victory!
Thanks for reading! I am already planning on my next wave, for the 4th match of escalation; bringing me to 1250 points. The wagon above might be getting a nice loud upgrade and perhaps a new friend to join in the feasting of tanks! All of that will be coming soon.
Take care,
❤ Soph
Da Bloody Skull Boyz: WIP 6
With the build done for the next 250 points, it was time to start painting. The bikers were the first to see paint. They saw a similar method as the previous six, before them. Here we see all nine bikers, finished!


It really looks nice to have all nine together on a board. These will be the last I do, for this army, as I move my focus toward other pieces.

The Big Mek biker was a big challenge to paint, in that the mini actual ork is half encased inside the doomwheel body. Much of the same went into this, for color schemes, but I did have to add a few new tricks. The lightning effect was a process involving stegadon scale green as a base and then washing with coelia greenshade. The layering steps were only used on the crackle effect. Sotek green formed the beginning layer, followed by temple guard blue and finally some white scar in corners and peaks for an extreme highlight.
The skull banner was done with brass scorpion as a base and washed with agrax earthshade. I used bonecrusher brass as a first layer, hitting it only in sparce areas to give it a different gleam in areas. Stormhost silver was then used as the extreme highlight, following the same line of thought for the previous step.

The battery looked too clean, so I decided to add a battery acid effect to it. This was very simple to achieve. I took small blobs of Valhallan Blizzard and covered the connectors. I tried to make random sized blobs as I placed them. I then followed up with just a little Nihilakh Oxide closer to the connectors. It was the perfect tint to give a realistic corroded battery connector.
Although I still lost match two, they were fun projects. Check out my next WIP coming very soon, to see what I did for round three. It promises to be a long one.
Da Bloody Skull Boyz: WIP 5

With my initial 500 point list behind me, I turned my eyes onto what I could add to this army, to bring it to 750. I crunched numbers and, after a few days of debate, decided to go with the following:
warbiker squad w/nob
Battlewagon w/deffrolla
Big Mek on warbike
The battlewagon would take the place of my trukk, for now, until points allowed for both. I had already briefly brainstormed what I would do for everything, while working on the initial 500 points, but now it was time to start cutting plastic.
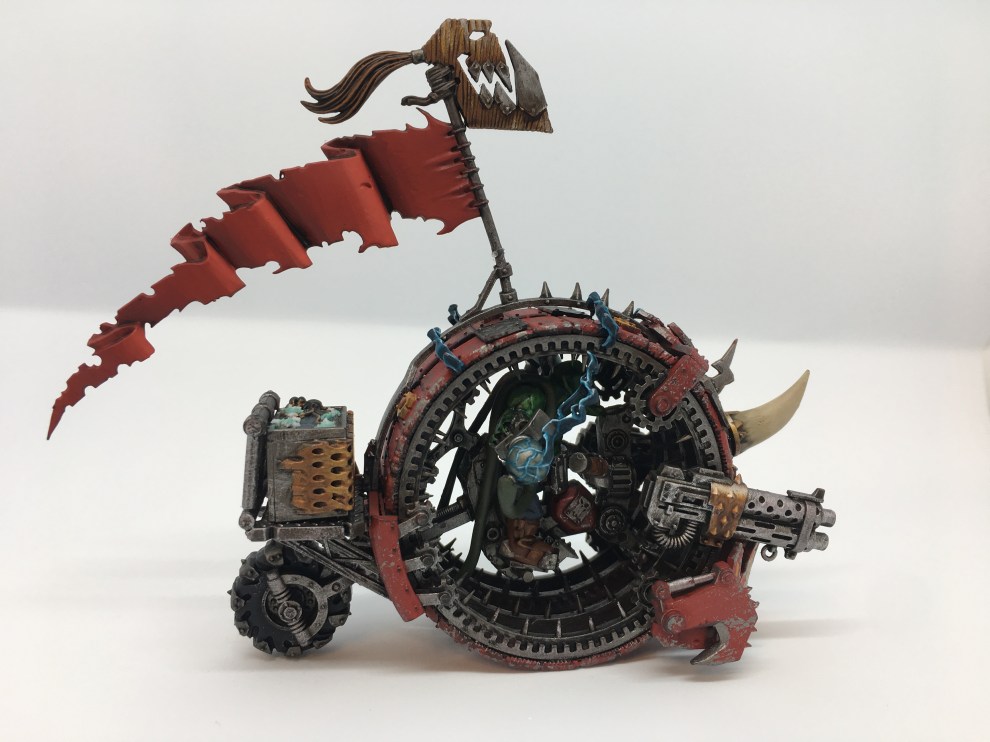
Today, we look at the Big Mek on warbike.
This took me a lot longer to think up than my previous conversions; about a week’s time. I knew the general gist of what I was trying to accomplish, but finding the right means saw me almost putting this guy on hold. Originally, when working on my other models, I had the idea to create something similar to the beautifully cinematic scene of the Bullet Farmer in Fury Road.
I loved this part, and thought it would be cool to have an ork weirdboy, standing on the pedals of a bike with his arms out and head tilted back, energy coursing through him. If you know 40k ork rules, then you’ll know what I quickly found out; no weirdboy on warbike! No matter… because you CAN give a bike to a Big Mek!
A conventional warbike would be too small, at least as-is. Many of the additions I looked at just didn’t fit it right, especially grot tank treads, servohauler treads (I really wanted treads!). In the end, while surfing GW’s site as I often do when I am looking for inspiration, I remembered the Skaven Doomwheel. It would be perfect for a weird looking Mek Bike, with a little bit of work and a few cuts.


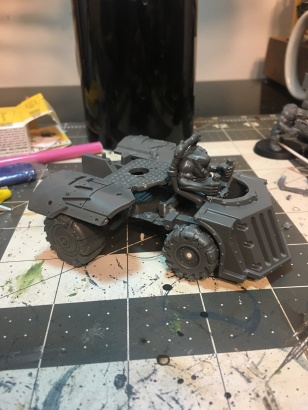
I started by cleaning and assembling the outer wheels. The skaven model has a lot of wood to it, so we would have to fix that. The Citadel mold line scraper made short work of the wood grain and made it nice and smooth, to go for a metal plate look.


I cleaned up the center piece and removed the support for the seat, as well as the wiring and warpstone (as seen on the right). Taking a warbike, I trimmed down enough to allow a snug fit into the center. I chose the warbike with petals already attached to the body, to allow something for our Big mek to stand on.


Next was the big guy himself. I used the legs cut from a Shokk Attack gun Big Mek and a torso cut from a savage orc; one of the two orcs in the kit holding the huge spear. While I could use the arms from the savage orc, I needed to do some small greenstuff work and reposition them, adding some muscle work. To cover the gap created by joining the two body pieces together, I made a belt from greenstuff and bits from the Shokk Attack Mek, as well as added some muscle work to smooth the transition. For the back, I mounted the big battery from the mek gun, using one of the platforms from the same kit. A warbiker wheel was swapped for the original, in the back. For the wheels, now that they were all smoothed out, I added rivets and diamond plate patches to both.


This was as far as I could go, with the kit segmented into three pieces. I glued the main three together, adding the gears to the bottom of the back. My whole idea for this character, was to have him crackling with energy. It started as a weirdboy, moving to a big mek with kustom force field. I pictured him holding two jumper cable ends together, an arch of electricity going over head. This was all before the doomwheel came into the picture, however. The wheel seemed far too big to achieve this… but what if, since it was to be made from metal, the electricity went into it and not over? I clipped off the mek’s arms at the elbows, using the prong ends from the shokk attack gun as the rest of his arms. Wrapping thin strips of greenstuff around the joint, I used tweezers and pulled at the putty until it looked like ripped flesh covering parts of the metal. I left portions of the electricity in tact, on the ends, lining them up as if to lash at the rim of the bike.


With our Mek in place, it was time to wire this bad boy up! I rolled greenstuff into two very long, thin strands and carefully looped it through the bottom of the bike, over each shoulder, and draped it slightly before connecting it to each orb end of his…..hands? Sure, we will go with hands…


Only thing left to fix was the front. I clipped off the front knobs to smooth it out and make way for my additions. At the top, I used the plate that came with the kit, connecting the two larger gears, but shaved off the skaven icon. Instead, I sanded down the back of the warbiker boss pole and fixed it atop. I created a cowcatcher using small bits of plastic rod, the large plate piece from the Ogre Kingdoms Ironblaster kit, and two claws from the Gorkanaut kit for the ends. I secured two dakkaguns from the warbike kit on each side, right above the cowcatcher, and placed a horn from the gorkanaut above it, covering where the top most knob was.
Lastly, I trimmed the top of the flag that came with the doomwheel and replaced the skaven icon with the sideways orruk banner from the orruk boar chariot kit.
Another conversion using bits from eight kits total; seems to be my magic number. I am extremely pleased with how he turned out and cannot wait to paint and field him in a couple weeks.
Next time, we will look at more bikers and a Battlewagon. Please drop me and comments or questions you may have. Thanks for reading!
❤
Soph
Da Bloody Skull Boys: WIP 3
Welcome back to another breakdown, part three of my Bloody Skull Boyz Ork army. So far we have covered most of the initial 500 point list created for an escalation league. There was only one piece left, and it certainly was the most involved and quite the journey.
The Warbuggy

Official Games Workshop image of the current Warbuggy.
I remember having this back when first buying the second edition starter set. It is a fossil that just looks out of place with kits made in this millennium- I’m not kidding, it came out July 1996 around the second edition codex; older than the wartrak (which is pretty bad these days) and the old bikers. I was determined not to look to the kit for anything, so the hunt began. Those who know me know that I shy away from most non GW bits or kits, so third party was out. It was looking like I was building this puppy from the ground up! Fortunately, I had a mountain of bits at my disposal, by this point, and some other tricks up my sleeve 😉
Remember the bike with the servohauler dome piece? Well, the idea for it spawned because I cut the dome portion off for this:


I had eyed the front grill from that kit for a while, feeling it would make for a great buggy. Having diced up a Taurox for my Trukk, I had a truck bed that I felt would work well, with the grill, to form the start. I had to modify each, seen above, to get them to connect. Cutting a notch in the back frome of the grill and then two on each edge of the truck bed, allowed them to fit together, seen below. I could already tell that this was going to be a collage from a number of different kits.
So far our kit count was two *(2).

I used frame bits from the ork trukk kit (3) to seat the wheels, cutting and trimming so they would rest flush on the sides of the truck bed.
While not shown, this was done for both the front and back wheels. The axel for each was created out of plastic rod, connecting each wheel and resting into the notch created by the ork trukk bits. The wheels for this came from the warbiker kit (4) and Mek gun kit (5); seen below.
 I may have gotten a little build happy, finding a groove, and pictures went to the wayside. Not to fret, I shall explain!
The driver was pulled from the ork trukk kit, with left over bit from the frukk frame used to steady the back. The back wheel wells were created from the Mek gun kit. The two door pieces from that kit were used to create the frame for the lager pieces that made up the cover, sitting on top of them. The center platform from the mek kit was placed into the center of the buggy, to form the turret base. At this point, the buggy was really starting to piece together. Just needed to mount the gunner, engine and clean it all up a bit.
 I added some piping, cut from the ork trukk turret, to stabilize the turret base. Using the rest of the trukk turret, I created a bit of a roll cage, seen to the right. It was pieced together using plastic rod, ork trukk, and mek gun bits; used to hold the turret in place and also wrapping around the engine. I snipped off the parts of the old taurox truck bed, at the tail end, to make it flush and sat the ork trukk engine in the space between the cage.
I built the rest of the turret as per standard ork trukk kit, using a warbiker dakkagun at first before swapping it out with the ork trukk gunner and big shoota. A 32mm base was used to stabilize and fill the gap between the turret bucket and the base. The driver received a head from the Megamobz kit (6) and a visor screen from the trukk kit. Finally, I trimmed off the gas tank from the ork trukk kit and fixed it onto the side. The meat of this buggy was finished!! That turret center just looked off, and unsightly, though. It was time to break out the plasticard!


Two types of plasticard were used here, plain white card from Evergreen and some diamond plate sheeting from Plastruct. I started by creating a frame sheet on each side, shaped to slide right in and neatly cover the entirety of the gap. Once in place, I cut different shapes and fixed them onto the sides. In addition to the plating, I took ork glyphs from the trukk kit and the flash gitz kit (7) and glued them on, as well. Once all plating was in place, I cut every small pieces of thin plastic rod into rivets and glued them around the edges of the plating, as seen before on my ork trukk. The final touch was adding the flag. This was made out of a flag from the Ironjawz Ardboys kit (8). I cut the beastman head out of it, fitted the skull front of a warbike in, and greenstuff gapfilled the connection points.
In the end; eight kits, one buggy! It was a lengthy build but a really fun one. With that build behind me, it was now time to put some paint to them. Part 4, to come soon, will tell a tale of a date with the warboss!
Please feel free to message if there is anything I may not have covered.
As always, thanks for reading!
❤ Soph

Da Bloody Skull Boyz: WIP 2
Last post, we saw what went into making the first piece I completed for my 500 point escalation army; the ork trukk. What is a trukk without some boys, though? I was biding my time, waiting for the holidays to end, so I could do some massive ork buying. That was when my #plasticfriends at my local Warhammer store surprised me with this!
 The ideas that I have, for all of this, are far too many to go into detail here (and I don’t want to give spoilers! You are just going to have to keep reading my blog :P). The battleforce is amazing for my project, being literally a kult of speed box. The skulls will definitely come in handy, as you will soon see, and the servohaulers… that is for another day 😉 We will discuss the boyz first, as they were a fairly simple build to do, have a lot of personality and turned out great for this project.
 The first five assembled can be seen above. I took a page from my freebootaz and used savage orc heads. I was able to cut the tongues off, for some, though most were used in my freebootaz. The rest I had to sculpt with greenstuff, as the empty mouth looked odd. I also used arms from the savage orc kit, giving some of them spears. My thought in this was to outfit them with things to throw from the back of the trukk. Rules wise, they will just be choppas, but I thought they added a bit to the character of these orks. While having vehicles, I wanted to paint a picture of borderline savage orks. I imagine this tribe on a world like Gorkamorka, working with a bare minimum amount of technology. The orks on the left received loin “cloths” from the nob kit, and the front most received a Mohawk from the Necromunda Goliath kit.
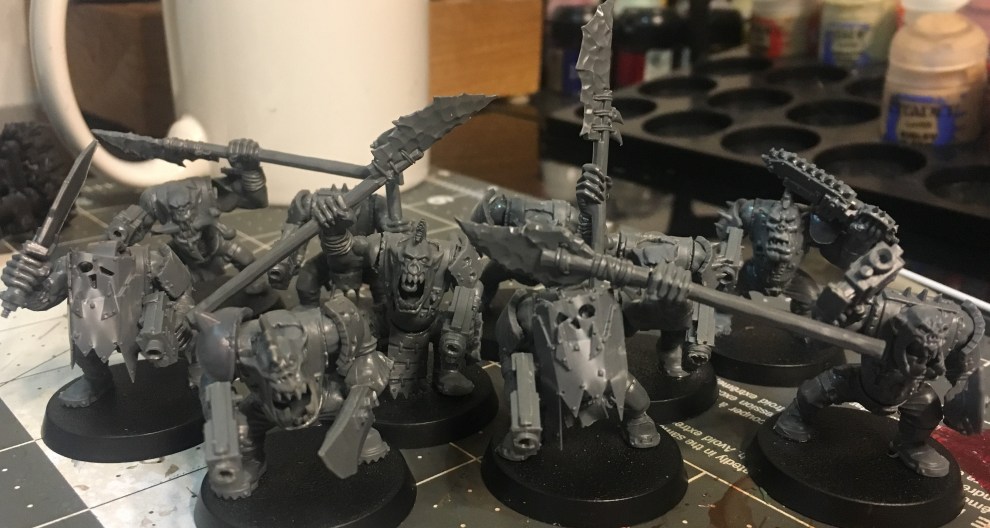 I fleshed this group of ten out even further when working on the last five. More spears were brought in, plus some plating for their arms (from the nob kit). Another Mohawk was fashioned, this time from the back spine of a bloodletter. I had some black orc shields that I thought would make great masks. I added them to the heads of two orks, using the thin plates from the nob kit as a top strap. All boyz went on 32mm bases. The stances they have just are too wide for the 25mms they come with. they look silly on them, compared to the 32mm bases.
The bikes I did up were fairly easy and straight forward, as well. Most simply saw a swapped out front.
 The first three bikers can be seen above. The chassis are all the same, using the core warbiker box, for these. The main change is the use of Deff Dread bits for the front. Each one came from that kit, which I now feel works perfectly for bikes. The bosspole for the Nob biker also came from that same kit. Bodies and rider arms on the regular bikers are from the normal bike kit. The nob biker arms came from the Nob kit, while the head is from numerous areas. The main head came from the flash gitz kit, while the gob was made from 3 separate pieces, cut from the shoulder decorations from Orruk brute kits. The spike Mohawk was fashioned from spikes on one of the ork boy kit shoulder pads.

Shown without spears.
More Deff Dread bits went into making the second set of bikes, utilizing the shoulders this time. The rounded piece from the servohauler grill, used for my buggy (which will have it’s own WIP writeup) was filed and placed ontop of one deff dread shoulder, while the other bike received two placed together. The third bike receive the top portion of the big clawfiend skull from the skull kit, which later received jewelers chain to make it look secured. The spears were fashioned using thin plastic rod and skulls from the skulls kit. Using a pin vice, I drilled holes into the top of each skull to allow them to slide snuggly onto the spear. The tips of the spears were just whittled to a point with a hobby knife.
Next post I will be going into the last bit of my 500 points; my scratch built warbuggy. Until then, thanks for reading
– Soph ❤

Da Bloody Skull Boyz: WIP 1
Orks has always been in my heart, ever since the pointy hat days of 2nd edition starter boxes. I have done all sorts of different incantations of them, my most recent having been some freebootaz that I began (and promise to finish!). My local Warhammer store is starting up an escalation league in January and I thought that it would be a great opportunity to crank some orks out. Instead of freebootaz however, I decided to go with speed freaks. There have been some conversions that I have been dying to play around with, and I figured this would be my chance.
I first outlined what would be in my starting 500 points list: Zhadsnark, 6 bikers, 1 buggy and a trukk with 10 boyz. I have wanted to mess around with making an ork trukk for some time, but the viability has been a bit lacking. Now they seem to be worth putting on a table, so my ideas are getting to see light. The ork trukk kit is great, mind you; It really gives a nice ramshackle look. I had something different in mind, however, and looked toward the Taurox model for the answers. I really liked the front of the taurox, and thought it would look fantastic as the front of a trukk.
I started by assembling the front to the bottom/bed of the taurox, as indented. While I did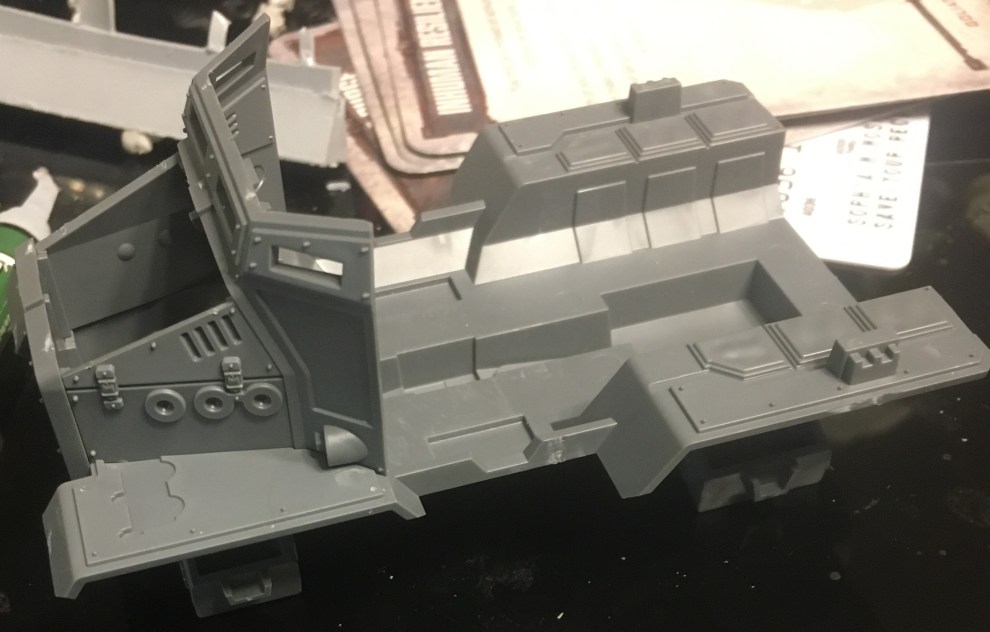 add the supports for the tracks, as seen in the picture above, I eventually chose to remove them. They did not work quite as well as I had hoped, for putting the wheels on.
 These two kits, at times, seemed like they were made for one another. I had to shave the bottom of the ork trukk bed, but ultimately it fit on surprisingly well. The trukk bed was built per the kit, with the front of the bed used to seal off the back of the cab, built to taurox kit standards, as well. The wheels were mounted on using the axels/frame of the ork kit. I shaved down the rounded center, to sit flush against the undercarriage. The whole build ended being a little longer than the original ork trukk, so I needed to use some plastic rod to connect the front wheel axel to the rear wheels.
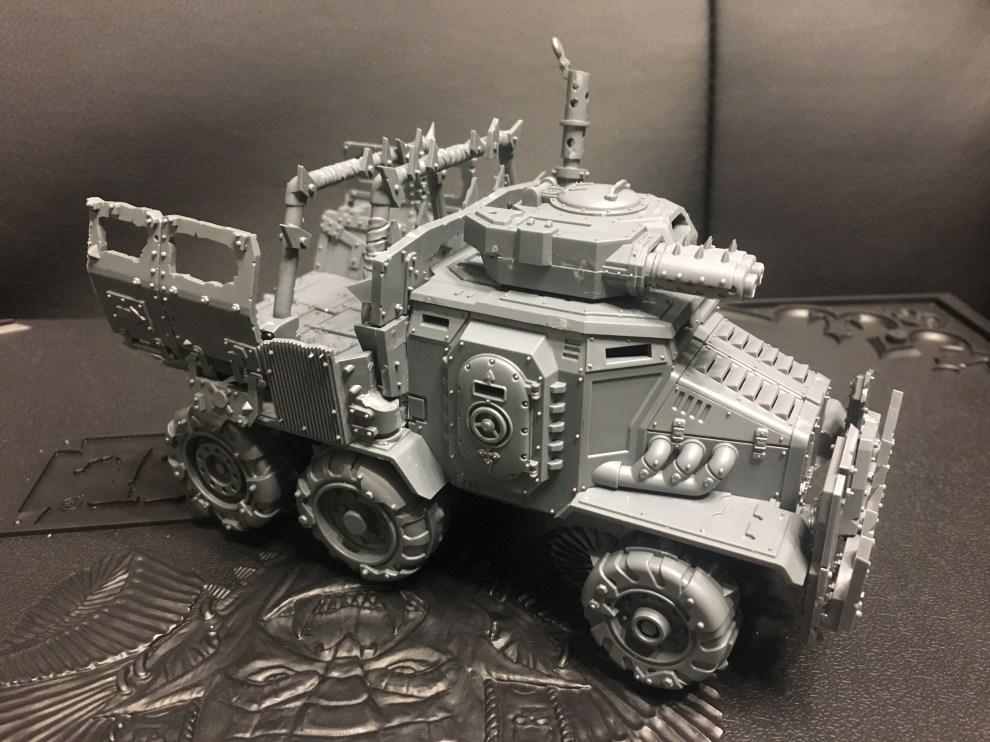 I added the standard piping to the taurox and gave it the ork trukk smoke stack on the side. I used two big shootas from the deff dread kit (I think that’s where they came from) and cut them to fit the turret hatch on the top of the taurox. For the back of the trukk, I added the roll cage bars, filled the gaps on the sides by cutting the corrugated trukk bit in half and shaving the ends down enough to fit against the sides. The hardest bit was the top half of what I used for the back of the cabin. The top of the taurox cabin has a lip in the back, so I had to cut the piece so that it could slide in with the lip inserting into it.
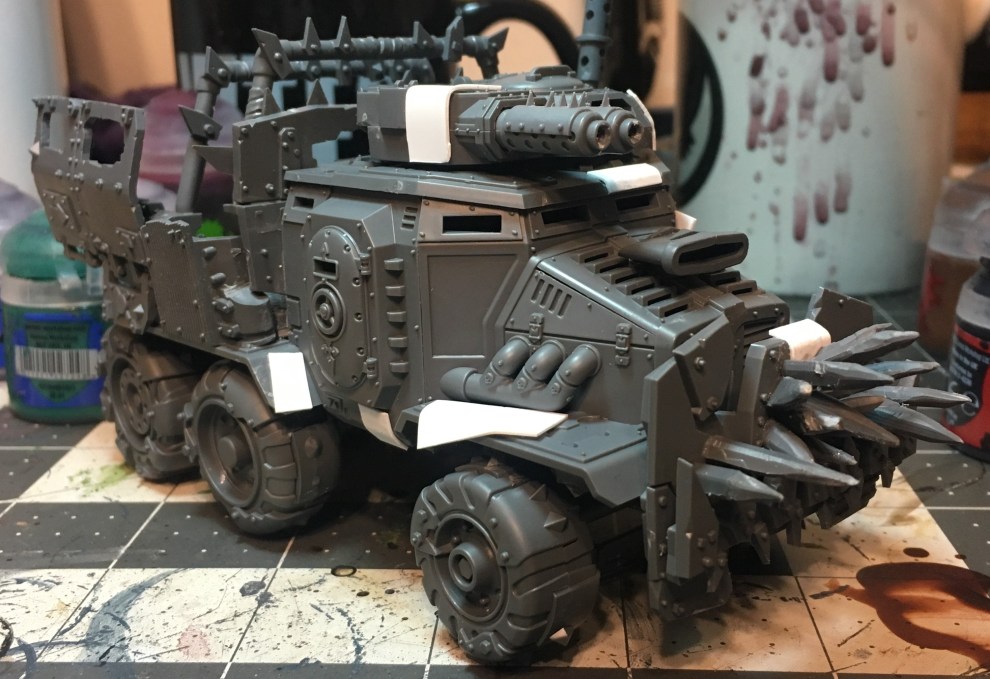 Let’s be honest; that taurox front was too clean looking 🙂 So I cut up some plasticard to act as metal sheeting, and glued it across the front, in patches. Cutting the vent off the top of the ork trukk kit engine, I fixed it into the hood by cutting a slot just big enough for the end to slide into. The spikes were made out of leftover sprue, cut and whittled into spikes as I watched Gremlins 2 to pass the time.
 The next step was extremely tedious, but I feel the outcome is well worth it. I used very thin plastic rod and sliced it to make very thin wafers. These served to be my rivets for the plasticard sheeting I added. I went through and glued them, in different densities, to each one. Through each panel, I also drilled a hole here and there, where a rivet should be. It is a nice way to break up the monotony of the task, and it looks like a rivet has fallen out, adding some character to the piece.
At this point, the trukk as primarily finished. I have plans to add spears and some skulls on it, but the core of the build has been completed. Next WIP, I will introduce you to the crazy lot that ride this beast into battle; the bloody skull trukk boyz, and I will talk bikers.
Thanks for reading 🙂 – Soph

Necromunda: House Escher WIP Part 3
Welcome back to the ongoing saga that is my Escher gang! If you have read part 1 and 2, you know all about my process in converting and preparing my gang to be painted. Having a few under my belt now, I have a solid process that I plan to take into the rest of the gang, and will share that with you now 🙂
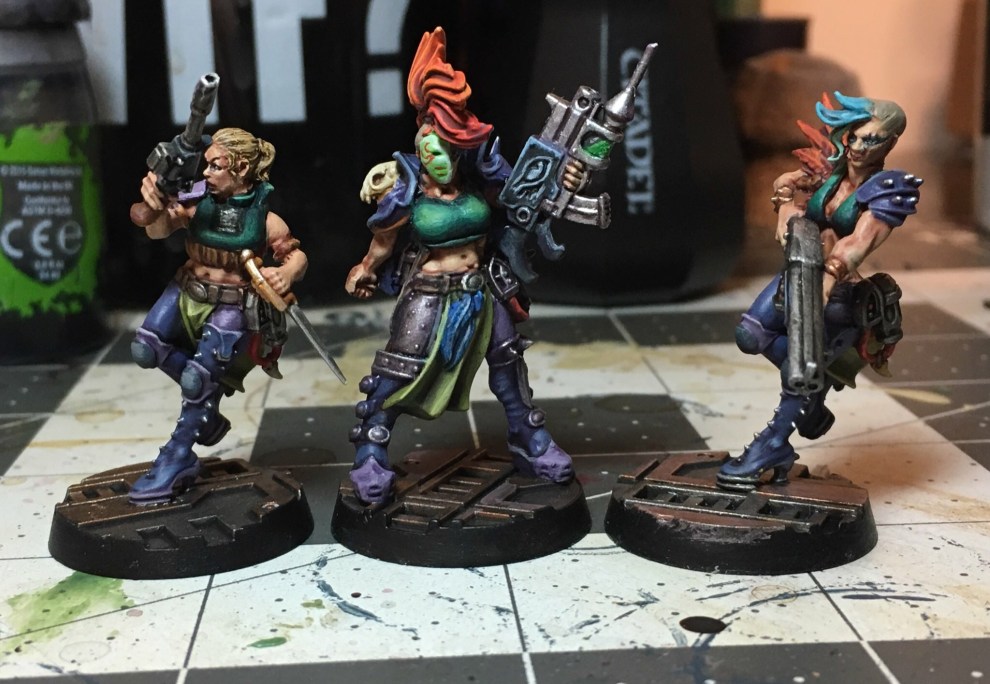
 I decided to start with my Tank Girl inspired ganger, aptly named Buck (Tank Girl’s name being Rebecca Buck). As a side note, it made me happy to be able to arm her with a shotgun, going for the double reference. Buck helped flesh out a lot of the gang color standard that you will see through the rest of the models. There are four standard transitions that I used here; skin, chest, boots/shoulder, and pant/knee colors. The boots and shoulders, except on a couple models, all receive the same color progression. I started with a base coat of The Fang, followed by a wash of Druchi Violet. Once dried I highlighted with The Fang once more, followed by Russ Grey for extreme highlight areas.

The lighter purple that you can see on the pants, shins and boots of Phantra, to the left, were a progression of Daemonette hide, druchi violet, a highlight of daemonette hide with warpfiend grey as the extreme. Their loin cloths, meant to be made from their prison world garb, were all done using deathworld forest as a base, athonian camoshade to shade, elysian green as highlight and ogryn camo on the extreme edges. Belts and straps were rynox hide, agrax earthshade, gorthor brown and then baneblade brown. Bone saw a traditional Zandri dust, seraphim sepia and then ushabti bone highlight. Eye makeup was simply Dark Reaper, while Phantra’s mask was a layer of
 waywatcher green, gauss blaster green highlight with evil sunz scarlet for the freehand. The tops/chest armor was a progression of glazing and shading to get the blending seen. Incubi darkness went on as a base, with carroburg crimson going on the under shade area of the chest to give a richer shade. Thin glazes of kabalite green and then sybarite green went on to form gradient highlighting, with coeliac greenshade used to tie in transitions. Skintone started with Bugman’s glow, followed by Riekland Fleshshade as a wash. Cadian Fleshtone started the base highlight, with kislev flesh forming the extreme highlight and, in areas like noses and knuckles, flayed one flesh used for a higher extreme. lips were simply bugmans glow with carroburg crimson washed over.

The faint shaved stubble on many of their heads, as seen on our sneering Juve, was achieved through glazing a 50/50 combination of mechanicus standard grey and kislev flesh, then changing it to a 2:1 ratio, heavier on the flesh tone. Flayed one flesh was used to give a scar here and there on the scalp. Eyes were nothing more than fleyed one flesh with rynox hide as the pupils, and eyebrows saw rynox as the color of choice, as well.
This covers most every color scheme on my Escher, thus far. Please feel free to comment or ask any specific questions, if I didn’t cover something that you want to know about. Thanks for reading 🙂

Necromunda: House Escher WIP Part 2
When I built my gang leader, I did it with aesthetic in mind. Her weapon loadout wasn’t created with any sort of point value calculated. With her done and my focus moving toward the rest of the gang, I needed to get that piece figured out so these were not only good looking but viable on the table.
 My champion was next in line for building. I gave her the combibolter that is normally seen on the gang leader, in stock builds, due to a lower cost. While the chem weapon option seems great, I opted to go cheaper and then outfit others with grenades to make up for the loss of template. The build was more straight forward, simply giving the coat and gun to her, while removing the whip. For some added difference, I covered over the chest to unify the plating and decided to give her a half mask. The idea popped that she uses it to cover the scar that she has. Also that if she has a scar like the leader, then it could be something ritualistic within the gang, perhaps a method of removing their penal world identification tattoos.
 I decided to skip to my Juves next. My list called for three of them, so I did them all in a bit of a batch build. These are supposed to be the fresh blood of the gang., so I imagined that they would be pulled from the population on Necromunda and not from the penal world; so no tattoos. Scarring would happen later, if they live long enough to seemembership. To make them seem newer, I used some heads from Victoria Miniatures again, as the hair isn’t as wild as the Escher. Like the champion, I used greenstuff to give more of a cloth look over the chest.
I hit a small wall when I started my gangers. The first two I decided to give some IG shoulderpads, keeping in theme with the looted armor that the leader had (the two on the right). otherwise the build was rather plain on them.
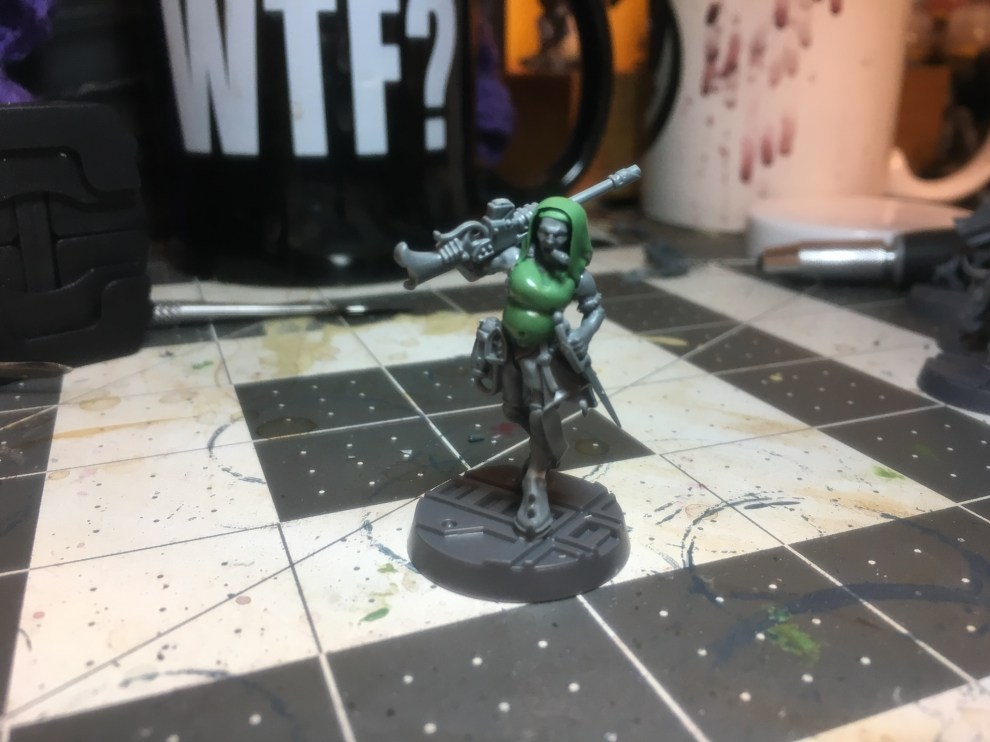
The farthest left used what I had learned while making the leader; using witch elf torsos. At this point I had covered over every models chest to make a “uniboob” torso. I decided to go the opposite, here. I have always been a fan of Tank Girl, so this was sort of inspired by her. I used greenstuff to fill out the bikini on her while trimming and smoothing out her head to give the shaven head look with just a couple bangs in the front left. The ganger next to her is when I started to add some humor to them. I found a space marine scope in my bits and thought it would be funny to put it on a shotgun. This eventually turned into making her a blind sniper, having double optic lenses to see, in addition to the scope. I stole a leg plate from the Goliath kit to add a little extra to her.
Then there was the final ganger…. if you follow my twitter feed, you probably saw her.
I made her on Monday’s stream. I had an idea to make a ganger with a gut, like Kiki Bulldozer from Raging Hero’s JailBirds. It was then suggested that she be made pregnant. I initially fought the idea but then, after finding it more humorous, decided to start sculpting it. I then remembered the cigars from the Goliath box and decided she needed to be smoking as well. The nun habit just seemed like natural progression, at that point, which was then added with greenstuff as well. It is a direct result of bad influences and feeding off from them. That being said, I love her and can’t wait to make her a focal point of the gang.
With her done, the gang build was complete.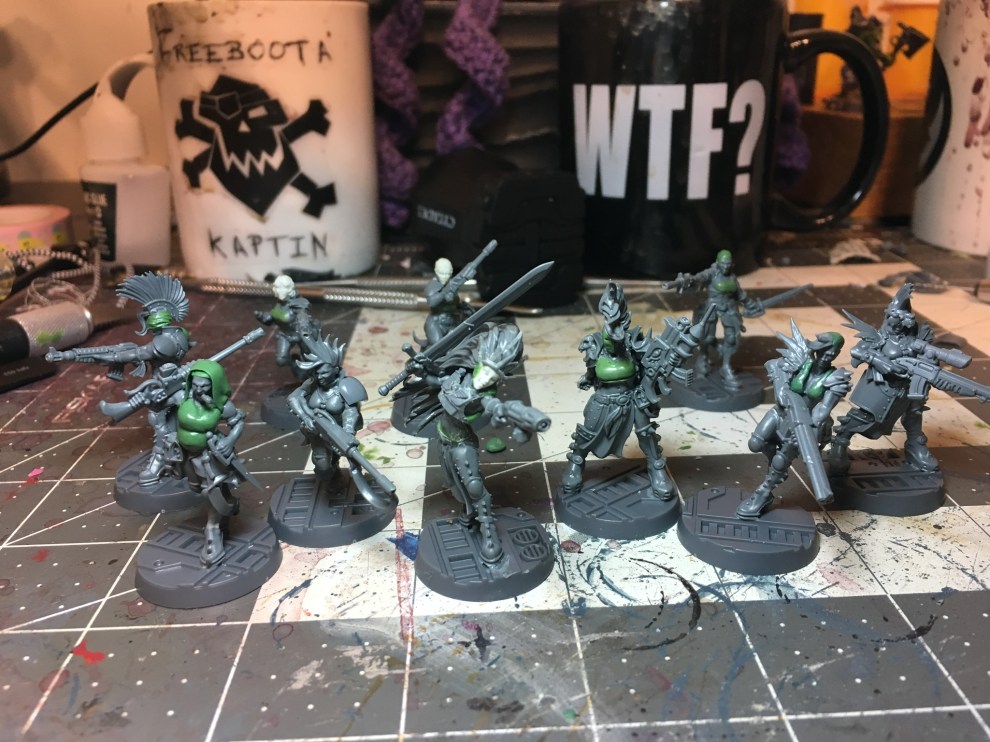 With assembly and sculpting finished, it was time to finish their story and put some paint on them. Who gets painted first? That is part 3’s job to tell us.
Until then, thanks for reading 🙂
Soph

Necromunda: House Escher WIP part 1
Like many in the gaming community, I was ecstatic when news dropped about Necromunda’s release. I was an avid player of the original, playing mostly Escher and Redemptionists. I truly loved the look of the models when I saw the new box but, as per usual, wanted to find ways to make them my own and to have them stand out from the basic kits. I finally got my hands on a box on release day and quickly set to do just that.
 I started with my leader, who in my mind should be the most flashy model to stand out from the rest. Having done multiple female builds at this point (with write-ups coming, super promise) I had a few options, when it came to bits. My eyes focused on the Age of Sigmar Sorceress model, having picked one up a while back to use for my Amazon team created from witch elves. I thought she could work nicely as a thrower at the time, but slowly the idea faded and she waited on the Warhammer Quest character back burner. The extended arm would work well for holding a pistol out, I had thought, so I started dicing her up and came up with an initial outline. The torso, once sawed off from the Sorceress, lined up perfectly with the Escher legs that were freed from their host. I had wanted to do a segmented leg, to give a different boot look, but the idea didn’t fully pan out and I went
  with the traditional leg for that portion of the kit. I used some greenstuff to do any minor gapfilling needed in order to join the two halves together. The extended arm was simple; I just cut the sorceress arm off at an angle to line up with the end of the glove. I was already falling in love with this pose and it started helping in fleshing out who this person was and what this gang would be like. I envisioned this woman staring down her plasma pistol completely relaxed and uncaring of what layed on the other end. The pose, with head tipped back would lay the foundation for the next ideas to pop in my head; the face. Fortunately, the faces for all the witch elf models are separate from the heads. They are far too angular for a human look, something I ran into when making my Amazon team. I needed something that would work well with this pose and this build. Fortunately, I didn’t have to look far. I had purchased some female heads from Victoria Miniatures to be used for my Sisters of Battle; the Guthrie female heads, to be exact. I had bought them after I learned that Armies on Parade did not allow 3rd part bits, so I had to find another solution. From these heads, I found the perfect head for her.
 The head was smiling, which I thought was a fantastic addition. Now I had this gang leader grinning as she eyes her target. I quickly thought of this mentally deranged gang who were escapees from a penal world, which was building off the generic penal inmate idea I originally had. I wanted to make them look unstable and give some looted gear, like it was lifted off from imperial guards during this escape. I was also leafing through the rulebook and absolutely loved the look of the Belladonna character art they put in there. It became a partial inspiration for where I headed, deciding I wanted a feather headdress for my leader. To build, the head was cut and filed to fit the head with hair being glued in place around it. I had to file down both her chest and the cadian plate piece heavily but after a bit of work, it fit. I also gave it some bullet holes; the blows she would have given the poor guardsman she took it from. The feathers would come from the Tzeentch Acolyte kits. I had them on hand, so it was an easy grab in order to get feathers; nine total. I made a crown from the iron halo from Saint Celestine, as I had a spare sitting around, and sat it overtop the feathers already in place. After the crown, everything else was downhill; a powersword clipped from a Sisters of Silence kit was fit onto her right hand and then I used greenstuff to sculpt the back piece for the vest. I decided to add some scarring on her right cheek and neck, to make her a little more weathered as a ganger. The result:
 A really fun build that took me about three or four days of work to do. I cannot wait to get some paint on her. We have ten others to build, however, which I will show you in part 2. Thanks for reading 🙂
